
If you’re at the mercy of US Occupational Safety & Health Administration (OSHA) or similar regulations, then you have to purchase and use expensive proprietary approved scaffolding and rigging devices. But, if not, then you have the opportunity to use your own resourcefulness, creativity and ingenuity or to use time-tested site-built devices to make working at height or raising heavy objects both easy and safe.
[See Safety on the Jobsite for the full list of Safety Tips]
For the 30 years of my building career, I’ve almost always relied on my own improvised or site-built methods, sometimes coupled with already available equipment (such as ladders, ladder jacks and wall and roof brackets) along with hand-picked rough-sawn planks to get me where I needed to go. These devices have never failed.

Testing the Strength of My Building Class’s First Project
Simple, site-built sawhorses are often the first thing built at any job-site, and they can double as scaffold horses. I often prefer to build them 24″ tall – what I call “saw ponies” – as they are more useful and versatile than standard 30″ horses. I’m still using these ponies 8 years later.


If you can nail to the sheathing or to window rough openings, there’s all kinds of options for exterior scaffolding, either with vertical ground posts or triangulated back to the building. Just make sure that vertical legs are well footed and cross-braced and that planks have positive stops or are clamped or nailed in place. And watch out for that “2 inch heart attack” where two planks overlap.


Site-built wall brackets can be custom-made to fit your wall framing (these are sized for my 12″ thick Riversong Truss walls and are “ambidextrous”) and require only two clamps per bracket to hold them securely in place (I would not use them on anything less than 2×6 studs on single walls). Note that the plank is also clamped to the bracket for safety.


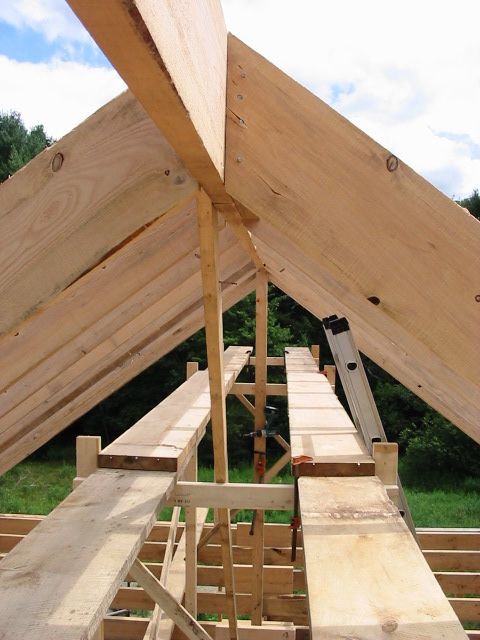 For roof framing, I place just-off-center uprights at the calculated ridge height to hold the ridge boards in place and build rectangular braced scaffold brackets to support planks at the right height to align and nail the rafters to the ridge board (the blocking on every second pair of ceiling joists is for a “gangplank” to access the attic above the loose-fill cellulose insulation level from a “hayloft” door at one gable end).


Similarly on the interior when the framing is exposed, temporary platforms can be built – in this case to work on the ceiling above a stairwell.
 Creative use of ladders – in this case, a 16′ extension ladder coupled with an 8′ step ladder – allows access in difficult areas, such as in this winding staircase to finish ceiling drywall. Note that planks are clamped to ladder.


Adjustable scaffold brackets, braced together, coupled with 2 old Lynn scaffold ladders that I found at a yard sale 20 some years ago, allows a “rising scaffold” along the entire length of a house for installing and applying the final finish coat to novelty drop siding and for roofing the south solar shading roof (clamps on 2×4 “rungs” not shown).


Classic triangle wall brackets with carpet padding are perfect for working above prefinished siding as they require no attachment other than gravity and a single, braced 2×4 post to the ground on a solid footing.


And, by simply using longer 2×4 legs (X-braced with strapping), you can “walk” up the wall to a nearly 16′ height.
 Using vertical struts to the legs allows the plank to be moved farther from the building (to clear the soffits, for example) without risking rotation of the wall brackets on the legs, and allows use of a guard-rail (not shown here).

They can be used on any wall surface that doesn’t allow easy attachment.
Combining roof brackets (strategically left in place after roofing) with a ladder jack and a site-built “cupola”, one can work up the siding along an ell addition.


And, with an aluminum scaffold plank, it’s even sturdy enough – with clamped toeboards – to use stepladders to reach the gable peak.

These aren’t mine, but they’re sturdy fixed-height wall brackets that double as access ladders, made from site scraps.
 When a ladder is at any angle shallower than 70°, it should have its feet fixed to the ground to prevent kick-out, either by stakes or tie-backs to the building.

And, it should be supported mid-span to prevent deflection. A ladder is designed for its rated load only when properly angled (a rung at shoulder height should be an outstretched arm’s length when your feet are at the base).  Particularly when extended, a two-section ladder must be supported when at a low angle, such as for roof access.
Note spring and bar clamps to keep assembly together, and prevent step ladder “strut” from shifting.
 An old boat trailer hand winch, attached to a 4×4 with a loose-pin butt hinge at the base (to attach to subfloor and allow pivoting), and a pillowblock pulley at the top (over which the cable rides), makes a great home-made wall lifter.


And, with a fixed base and a slight forward lean (which makes it into a braced monkey), the same rig works as a beam raiser (or for any other load).

Jinniwink Crane (version 1)
A home-made rotating-base Jinniwink is useful for lifting and placing loads, such as on this flat-bed trailer, using a cable come-along for angling and a rope pulley system through a butt block for lifting.

4:1 Jigger for Mechanical Advantage

Jinniwink Boom Top Block

Jinniwink Crane (version 2)
In this version, a cable come-along serves for both lifting and angling, with the boom base rotating as the load is brought aboard.
 A simple lashed tripod can assist in raising loads.
***


 Or a simple gin pole with a clove hitch can be used as a vector redirect for timberframe raising…
 ***
*** A log “dead man” anchor, held in place by a pair of triple “pickets”, tied back with twisted “windlass” cordage or webbing can provide considerable resistance for a mechanical advantage hauling system.
 Low-stretch kernmantle rope, aluminum swing-cheek pulleys, and 8mm nylon prusik cords creates as much mechanical advantage as required (in this case a complex 5:1) to move otherwise immovable objects – even by a single person.
 Rollers (1″ iron pipe) dramatically reduce friction and allow heavy objects – even whole buildings – to move with relative ease, and can even be angled to force a turn.
 Jack ledger, poles and screw jacks to raise second floor and roof…
 …so that wall and rotted sills can be replaced.
 PT 4×4 post, angled jack base & screw jack to raise porch roof to level and repair porch.
 Jack ledger, posts and screw jacks to remove and rebuild barn foundation.

 Double 4:1 pulley systems for raising new beam sections to replace rotted beam.

************************************************************************************
This site is my gift to you. If you find value here and are moved to reciprocate:
![]()
If you need project consultation or design services, contact me directly at
HouseWright (at) Ponds-Edge (dot) net.
************************************************************************************

This is very helpful, thank you. Surrounded by off-the-shelf solutions we forget what human ingenuity looks like.
Thanks for sharing these great ideas, and for the rest of the ideas in this series.
🙂
Nice. My new word for the day is jenniwink!
Thanks for the usefull post. I am using your triangle scaffolding idea on the house I am building for installing siding on the second floor. Works great. I was a little apprehensive at first, but once i started using it I found it to be far more solid then any commercial setup i have used.
I can send a photo if you tell me how.
Thanks
Dave
Dave,
I’m glad the brackets are working for you. Unlike pipe staging, they don’t depend on level ground. And, unlike pump jacks, they don’t suffer from mechanical failure and get stuck, nor do they require any attachment to the house.
You can send photos to HouseWright (at) Ponds-Edge (dot) net. If you feel my ideas have been valuable to your project, you can also send a donation by clicking on the PayPal button at the bottom of this page.
This is one area where we don’t see much coverage on the net. I was familiar with many of these ideas, but had, for instance, not seen the triangle jacks used so high off the ground. Just seeing the instances of use opens up one’s mind.
https://books.google.ca/books/content?id=d88DAAAAMBAJ&pg=PA139&img=1&zoom=3&hl=en&sig=ACfU3U1NjQQt5oM7zgxJQhuR31D8xZSx4Q&w=1280
https://books.google.ca/books/content?id=d88DAAAAMBAJ&pg=PA260&img=1&zoom=3&hl=en&sig=ACfU3U08V-bWcSyldyeFRV0UI_5dsyetTA&w=1280
https://books.google.ca/books/content?id=0t8DAAAAMBAJ&pg=PA527&img=1&zoom=3&hl=en&sig=ACfU3U3zgGeqA6uRG0EOiCUrrLB2OWv6tw&w=1280
https://books.google.ca/books/content?id=Vt4DAAAAMBAJ&pg=PA849&img=1&zoom=3&hl=en&sig=ACfU3U0eCElVig3url7mhyDp73fePNxhRQ&w=1280
ranging from 1905 to 1979, top to bottom.
Tam, thanks for the links.
This pic is taken from some movie that has a chase through a boatyard. I saw a scaffolding built on a house around here, but didn’t get a picture soon enough. It had the same chair shape as the one in the pic, maybe it is boatyard thing. It provides the advantage of a handrail, and trimmers under the crosspieces, but it isn’t adjustable. Of course the bracing should be regarded with suspicion, as it was designed to allow the whole thing to come down.
TamD,
Thanks for the picture. That’s a perfect example of job-specific site-built scaffolding, though I agree the bracing could have been more robust.
Great article, I was especially interested in the triangle wall brackets. I have to get up to 32′ on a 12/12 pitch roof, to side and soffit. Do you think you could use the same set up with sistered support 2x4s (essentially a 3x4x30) or is it simply too tough too manage over 16′. At this height I would also be using a safety harness.
Len,
I would not use the triangle brackets beyond 16′. On a high gable end, use a pair of HD extension ladders, ladder jacks and a sturdy (preferably OSHA-approved) plank or aluma-plank.
Very well written by someone who plainly has the experience and education to inspire confidence. Thank you sir
Bravo Riversong… like someone said earlier – in todays world of push button hydraulics and zoom booms… we are losing the basic levers, jacks and shoring skills that are the foundation of basic construction, barn raising skills, bridges and skyscrapers…
think I’ll forward this to the 2 young and eager engineers I met with tonight to go over majour structural failures on a building only 16 years old…
my grandfathers’ (foreman) built 150 yr old wheat pool graneries that need controlled demolition to bring them down – our machinery cant touch them.
I’ve been awed at how even historic 3-story hay barns are resilient —– I’ve opened and repaired many as a chore… yet I push my fingers thru rotted structure daily in our modern assemblies.
keep up teaching and preaching…
there is a reason why roman structures stand till this day…..
Wow. Not to diminish the clear and helpful nature of the post, but this may as well be voodoo to me. Incredible stuff. I could spend literally an entire lifetime on a deserted island with all the items shown here and never come even close to pulling one of them off.
Where does somebody go (other than their 9 to 5 for decades) to learn these types of things? When extra support is needed, where it’s needed, which angles are suitable, and how to go about it.
It would have to be comprehensible to a guy who quite honestly doesn’t know a 2×4 from any other set of numbers separated by an x (and who has put some thought into it, as well).
Mack,
If this very simple technology is “voodoo” to you and you don’t know what a 2×4 is, then I’d advise you to stay away from it.
These tools and technologies were developed, often intuitively, by generations of builders and home-grown engineers whose intuition was “educated” by working with their hands all their lives and quite literally building their world.
However, if you want to get out of your cubicle and learn fundamental skills – then you need to take the initiative to seek them out. I wish I could say there were lots of schools of the old arts, but there are places that offer bits and pieces.
I’m packing up right now to head to the annual Maine Puckerbrush Primitive Gathering, where I’ll be giving free workshops on knotcraft and Rigging, Rolling & Raising techniques. I used to teach them at a design/build school in Vermont and I may be teaching a week-long course at a famous Maine wooden boat school next year.
Seek and ye shall find!